Reliable and “Debuggable” Automated Testing of Message Based Systems in a Crazy Async World

In my last post on Automated Testing of Message Based Systems, I talked about how we are able to collapse all the necessary pieces of distributed messaging systems down to a single process and why I think that makes for a much better test automation experience. Once you can reliably bootstrap, tear down, and generally control your distributed application from a test harness, you move on to a couple more problems: when is a test actually done and what the heck is going on inside my system during the test when messages are zipping back and forth?


Knowing when to Assert in the Asynchronous World

Since everything is asynchronous, how does the test harness know when it’s safe to start checking outcomes? Any automated test is more or less going to follow the basic “arrange, act, assert” structure. If the “act” part of the test involves asynchronous operations, your test harness has to know how to wait for the “act” to finish before doing the “assert” part of a test in order for the tests to be reliable enough to be useful inside of continuous integration builds.

For a very real scenario, consider a test that involves:

  1. A website application that receives an HTTP POST, then sends a message through the service bus for asynchronous processing
  2. A headless service that actually processes the message from step 1, and quite possibly sends related messages to the service bus that also need to be finished processing before the test can do its assertions against expected change of state.
  3. The headless service may be sending messages back to the website application

To solve this problem in our test automation, we came up with the “MessageHistory” concept in FubuMVC’s service bus support to help order test assertions after all message processing is complete. When activated, MessageHistory allows our test harnesses to know when all message processing has been completed in a test, even when multiple service bus applications are taking part in the messaging work.

When a FubuMVC application has the service bus feature enabled, you can activate the MessageHistory feature by first bootstrapping in the “Testing” mode like so:

public class ChainInvokerTransportRegistry 
    : FubuTransportRegistry<ChainInvokerSettings>
{
    public ChainInvokerTransportRegistry()
    {
        // This property opts the application into
        // the "testing" mode
        Mode = "testing";

        // Other configuration declaring how the application
        // is composed. 
    }
}

In a blog post last week, I talked about How we do Semantic Logging, specifically how we’re able to programmatically add listeners for strong typed audit or debug messages. By setting the “Testing” mode, FubuMVC adds a new listener called MessageRecordListener to the logging that listens for logging messages related to the service bus message handling. The method below from MessageRecordListener opts the listener into any logging message that inherits from the MessageLogRecord class we use to mark messages related to service bus processing:

        public bool ListensFor(Type type)
        {
            return type.CanBeCastTo<MessageLogRecord>();
        }

For the purposes of the MessageHistory, we listen for:

  1. EnvelopeSent — history of a message that was sent via the service bus
  2. MessageSuccessful or MessageFailed — history of a message being completely handled
  3. ChainExecutionStarted — a message is starting to be executed internally
  4. ChainExecutionFinished — a message has been completely executed internally

All of these logging messages have the message correlation id, and by tracking the outstanding “activity started” messages against the “activity finished” messages, MessageHistory can “know” when the message processing has completed and it’s safe to start processing test assertions. Even if an automated test involves multiple applications, we can still get predictable results as long as every application is logging its information to the static MessageHistory class (I’m not showing it here, but we do have a mechanism to connect message activity back to MessageHistory when we use separate AppDomain’s in tests).

Just to help connect the dots, the MessageRecordListener relays information about work that’s started or finished to MessageHistory with this method:

        public void DebugMessage(object message)
        {
            var log = message.As<MessageLogRecord>();
            var record = log.ToRecord();

            if (record.IsPollingJobRelated()) return;

            // Tells MessageHistory about the recorded
            // activity
            MessageHistory.Record(log);

            _session.Record(record);
        }


Inside of test harness code, the MessageHistory usage is like this:

MessageHistory.WaitForWorkToFinish(() => {
    // Do the "act" part of your test against a running
    // FubuMVC service bus application or applications
}).ShouldBeTrue();

This method does a couple things:

  1. Clears out any existing message history inside of MessageHistory so you’re starting from a blank slate
  2. Executes the .Net Action “continuation” you passed into the method as the first argument
  3. Polls until there has been at least one recorded “sent” tracked message and all outstanding “sent” messages have been logged as completely handled or until the configured timeout period has expired.
  4. Returns a boolean that just indicates whether or not MessageHistory finished successfully (true) or just timed out (false).

For the pedants and the truly interested among us, the WaitForWorkToFinish() method is an example of using Continuation Passing Style (CPS) to correctly order the execution steps. I would argue that CPS is very useful in these kinds of scenarios where you have a set order of execution but some step in the middle or end can vary.


Visualizing What the Heck Just Happened

The next big challenge in testing message-based, service bus applications is being able to understand what is really happening inside the system when one of these big end to end tests fails. There’s asynchronous behavior and loosely coupled publish/subscribe mechanics. It’s clearly not the easiest problem domain to troubleshoot when things don’t work the way you expect.

We have partially solved this problem by tying the semantic log messages produced by FubuMVC’s service bus system into the results report of our automated tests. Specifically, we use the Storyteller 3 project (one of my other OSS projects that is being criminally neglected because Marten is so busy) as our end to end test harness. One of the powerful features in Storyteller 3 is the ability to publish and embed custom diagnostics into the HTML results report that Storyteller produces.

Building on the MessageRecordListener setup in the previous section, FubuMVC will log all of the service bus activity to an internal history. In our Storyteller test harness, we wipe out the existing state of the recorded logging messages before the test executes, then at the end of the specification run we gather all of the recorded logging messages for just that test run and inject some custom HTML into the test results.

We do two different visualizations, a “threaded” message history arranged by the history of a single message, who published it, who handled it, and what became of it?

ThreadedMessageHistory

The threaded history view helps to understand how a single message was processed from sender, to receiver, to execution. Any error steps will show up in the threaded history. So will retry attempts and any additional messages triggered by the topmost message.

We also present pretty well the same information in a tabular form that exposes the metadata for the message envelope wrapper at every point some activity is recorded:

MessageActionHistory


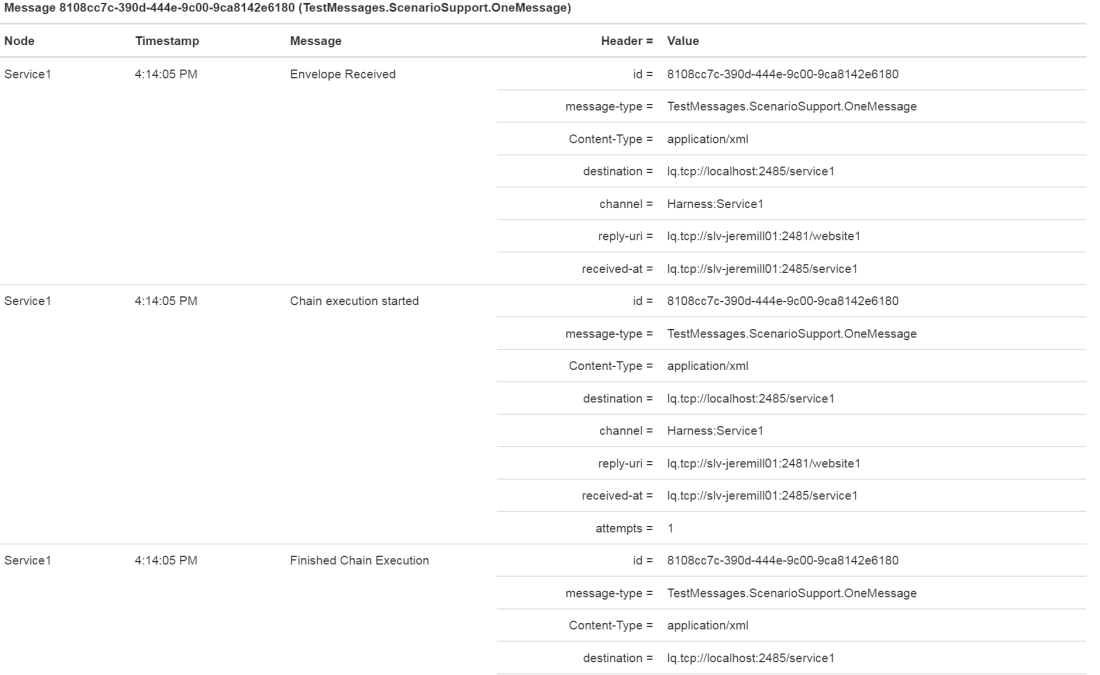
I’m using images for the blog post, but these reports are written into the Storyteller HTML results. These diagnostics have been invaluable to us in understanding how our message based systems actually behave. Having these diagnostics as part of the test results on the CI server has been very helpful in diagnosing failures in the CI builds that can be notoriously hard to debug.

Next time…

At some point I’ll blog about how we integrate FubuMVC’s HTTP diagnostics into the Storyteller results and maybe a different post about the performance tracking data that Storyteller exposes as part of the testing results. But don’t look for any of that too soon;)

Batch Queries with Marten

Marten v0.7 was published just under two weeks ago, and one of the shiny new features was the batched query model with let’s say a trial balloon syntax that was shot down pretty fast in the Marten Gitter room (I wasn’t happy with it either). To remedy that, we pushed a new Nuget this morning (v0.7.1) that has a new, streamlined syntax for the batched query and updated the batched query docs to match.

So here’s the problem it tries to solve, say you have an HTTP endpoint that needs to aggregate several different sources of document data into a single, aggregated JSON message back to your web client (this is a common scenario in a large application at my work that is going to be converted to Marten shortly). To speed up that JSON endpoint, you’d like to be able to batch up those queries into a single call to the underlying Postgresql database, but still have an easy way to get at the results of each query later. This is where Marten’s batch query functionality comes in as demonstrated below:

// Start a new IBatchQuery from an active session
var batch = theSession.CreateBatchQuery();

// Fetch a single document by its Id
var user1 = batch.Load<User>("username");

// Fetch multiple documents by their id's
var admins = batch.LoadMany<User>().ById("user2", "user3");

// User-supplied sql
var toms = batch.Query<User>("where first_name == ?", "Tom");

// Query with Linq
var jills = batch.Query<User>().Where(x => x.FirstName == "Jill").ToList();

// Any() queries
var anyBills = batch.Query<User>().Any(x => x.FirstName == "Bill");

// Count() queries
var countJims = batch.Query<User>().Count(x => x.FirstName == "Jim");

// The Batch querying supports First/FirstOrDefault/Single/SingleOrDefault() selectors:
var firstInternal = batch.Query<User>().OrderBy(x => x.LastName).First(x => x.Internal);

// Kick off the batch query
await batch.Execute();

// All of the query mechanisms of the BatchQuery return
// Task's that are completed by the Execute() method above
var internalUser = await firstInternal;
Debug.WriteLine($"The first internal user is {internalUser.FirstName} {internalUser.LastName}");

Using the batch query is a four step process:

  1. Start a new batch query by calling IDocumentSession.CreateBatchQuery()
  2. Define the queries you want to execute by calling the Query() methods on the batch query object. Each query operator returns a Task<T> object that you’ll use later to access the results after the query has completed (under the covers it’s just a TaskCompletionSource).
  3. Execute the entire batch of queries and await the results
  4. Access the results of each query in the batch, either by using the await keyword or Task.Result.


A Note on our Syntax vis a vis RavenDb

You might note that the Marten syntax is quite a bit different syntax-wise and even conceptually to RavenDb’s Lazy Query feature. While we originally started Marten with the idea that we’d stay very close to RavenDb’s API to make the migration effort less difficult, we’re starting to deviate as we see fit. In this particular case, I wanted the API to be more explicit about the contents and lifecycle of the batched query. In other cases like the forthcoming “Include Query” feature, we will probably stay very close to RavenDb’s syntax if we don’t have any better ideas or strong reason to deviate from the existing art.


A Note on “Living” Documentation

I’ve received a lot of criticism over the years for having inadequate, missing, or misleading documentation for the OSS projects I’ve ran. Starting with Storyteller 3.0 and StructureMap 4.0 last year and now Marten this year, I’ve been having some success using Storyteller’s static website generation to author technical documentation in a way that’s been easy to keep code samples and content up to date with changes to the underlying tool. In the case of the batched query syntax from Marten above, the code samples are pulled directly from the acceptance tests for the feature. As soon as I made the changes to the code, I was able to update the documentation online to reflect the new syntax from running a quick script and pushing to the gh-pages branch of the Marten repository. All told, it took me under a minute to refresh the content online.

Storyteller, Continuous Integration, and the Art of Failing Fast

Someone today asked me if it were possible to use Storyteller 3 as part of their continuous integration builds. Fortunately, I was able to answer “yes” and point them to documentation on running Storyteller specifications with the headless “st run” command. One of my primary goals for Storyteller 3 was to make our existing continuous integration suites faster, more reliable, and for heaven’s sake, fail fast instead of trying to execute specifications against a hopelessly broken environment. You might not have any intention of every touching Storyteller itself, but the lessons we learned from earlier Storyteller and the resulting improvements in 3.0 I’m describing in this post should be useful for using any kind of test automation tooling.

How Storyteller 3 Integrates with Continuous Integration

While you generally author and even execute Storyteller specifications at development time with the interactive editor web application, you can also run batches of specifications with the “st run” command from the command line. By exposing this command line interface, you should be able to incorporate Storyteller into any kind of CI server or build automation tooling.

The results are written to a single, self-contained HTML file that can be opened and browsed directly (the equivalent report in earlier versions was a mess).


Acceptance vs. Regression Specs

This has been a bit of a will o’wisp always just out of reach for most of my career, but ideally you’d like the Storyteller specifications to be expressed – if not completely implemented – before developers start work on any new feature or user story. If you really can pull off “acceptance test driven development”, that means that you may very well be trying to execute Storyteller specifications in CI builds that aren’t really done yet. That’s okay though, because Storyteller let’s you mark specifications as two different “lifecycle” states:

  1. Acceptance – The default state, just tells Storyteller that it’s a work in progress
  2. Regression – The functionality expressed in a specification is supposed to be working correctly

For CI builds, you can either choose to run acceptance specifications strictly for informational value or leave them out for the sake of build times. Either way, the acceptance specs do not count toward the “st run” tool passing or failing the build. Any failures while running regression specifications will always fail the build though.


Being Judicious with Retries

To deal with “flaky”tests that had a lot of timing issues due to copious amounts of asynchronous behavior, the original Storyteller team took some inspiration from jQuery and added the ability to make Storyteller retry failing specifications a certain number of times and accept any later successes.

You really shouldn’t need this feature, but it’s an imperfect world and you might very well need this feature. What we found in earlier Storyteller though was that the retries were too generous and made the CI build times take far too long when things went off the rails.

In Storyteller 3, we adopted some more stringent guidelines for when and when not to retry specifications:

  1. The new default behavior is to not allow retries. You now have to opt into retries either on a specification by specification basis (recommended) or supply a default maximum retry count as a command line argument.
  2. Acceptance specifications are never retried
  3. Specifications will never be retried if an execution detects “critical” or “catastrophic” errors. This was done to try to distinguish between “timing errors” and cases where the system just flat out fails. The classic example we used when designing this behavior was getting an exception when trying to navigate to a new Url in a browser application.


Failing Faster This Time

Prior to Storyteller 3, our CI builds could go on forever when the system or environment was non-functional. Like many acceptance testing tools – and opposite of xUnit tools – Storyteller tries to run a specification from start to finish, even if any early step fails. This behavior is valuable when you have an expensive scenario setup for multiple assertions so that you can maximize the feedback when you’re attempting to fix the failures. Unfortunately, this behavior also killed us with runaway CI builds.

The canonical example my colleagues told me about was trying to navigate a browser to a new Url with WebDriver, the navigation failing with some kind of “YSOD”, but Storyteller still trying to wait until certain elements were visible — then add the retries into the now mess.

To alleviate this kind of pain, we invested a lot of time into making Storyteller 3 “fail fast” in its CI runs. Now, if Storyteller detects a “StorytellerCriticalExecution” or “StorytellerCatastrophicException” (the entire system is unresponsive), Storyteller 3 will immediately stop the specification execution, bypass any possible retries, and return the results so far. Underneath the covers, we made Storyteller treat any error in Fixture setup or teardown as critical exceptions.

“Catastrophic” exceptions would be caused by any error in trying to bootstrap the application or system wide setup or teardown. In this case, Storyteller 3 stops all execution and reports the results with the catastrophic exception message. Based on your own environment tests, users can also force a catastrophic exception that effectively sets the breaks on the current batch run (for things like “can’t connect to the database at all”).

This small change in logic has done a lot to stop runaway CI builds when things go off the rails.


Why so slow?

The major driver for launching the Storyteller 3 rewrite was to try to make the automated testing builds on a very large project much faster. On top of all the optimization work inside of Storyteller itself, we also invested in adding the collection of performance metrics about test execution to try to understand what steps and system actions were really causing the testing slowness (early adopters of Storyteller 3 have consistently described the integrated performance data as their favorite feature).

While all that performance data is embedded in the HTML results, you can also have that information dumped into either CSV files for easy import into tools like Excel or Access or exported as Storyteller’s own JSON format.

By analyzing the raw performance data with simple Access reports, I was able to spot some of the performance hot spots of our large application like particularly slow HTTP endpoints, a browser application probably being too chatty to the backend, and even spot pages that were slow to load. I can’t say that we have all the performance issues solved yet, but now we’re much more informed about the underlying problems.


Optimizing for Batch Execution

With Storyteller 3 I was trying to incorporate every possible trick we could think of to squeeze more throughput out of the big CI builds. While we don’t completely support parallelization of specification runs yet (but we will sooner or later), Storyteller 3 partially parallelizes the batch runs by using a cascading series of producer/consumer queues to:

  1. Read in specification data
  2. “Plan” the specification by doing all necessary data coercion and attaching the raw spec inputs to the objects that will execute each step. Basically, do everything that can possibly be done before actually executing the specification.
  3. Execute specifications one at a time

The strategy above can help quite a bit if you need to run a large number of small specifications, but doesn’t help much at all if you have a handful of very slow specification executions.

Table Based Specs and Custom Assertions with Storyteller 3

After over a year of work, I’m finally getting close to making an official 3.0 release of the newly rebuilt Storyteller project for executable specifications (BDD). There’s a webinar on youtube that I got to record for JetBrains for more background.

As a specification tool, Storyteller shines when the problem domain you’re working in lends itself toward table based specifications. At the same time, we’ve also invested heavily in making Storyteller mechanically efficient for expressing test data inputs with tables and the ability to customize data parsing in the specifications.

For an example, I’ve been working on a small OSS project named “Alba” that is meant to be a building block for a future web framework. Part of that work is a new HTTP router based on the Trie algorithm. One of our requirements for the new routing engine was to be able to detect routes with or without parameters (think “document/:id” where “id” is a routing parameter) and to be able to accurately match routes regardless of what order the routes were added (ahem, looking at you old ASP.Net Routing Module).

This turns out to be a pretty natural fit for expressing the requirements and sample scenarios with Storyteller. I started by jotting some notes on how I wanted to express the specifications by first setting up all the available routes in a new instance of the router, then running a series of scenarios through the router and proving that the router was choosing the correct route pattern and determining the route arguments for the routes that have parameters. That results of one of the specifications for the routing engine is shown below (but cropped for space):

AlbaSpec

Looking at the spec above, I did a couple things.

  1. “If the routes are” is a table grammar that just configures a router object with the supplied routes
  2. “The selection and arguments should be” is a second table grammar that takes in a Url pattern as an input, then asserts expected values against the route that was matched in the “Selected” column and uses a custom assertion to match up on the route parameters parsed from the Url (or asserts that there was “NONE”).

To set up the routing table in the first place, the “If the routes are” grammar is this (with the Fixture setup code to add some necessary context”:

        // This runs silently as the first step of a 
        // section using this Fixture
        public override void SetUp()
        {
            _tree = new RouteTree();
        }

        [ExposeAsTable("If the routes are")]
        public void RoutesAre(string Route)
        {
            var route = new Route(Route, HttpVerbs.GET, _ => Task.CompletedTask);

            _tree.AddRoute(route);
        }

The table for verifying the route selection is implemented by a second method:

        [ExposeAsTable("The selection and arguments should be")]
        public void TheSelectionShouldBe(
            string Url, 
            out string Selected, 
            [Default("NONE")]out ArgumentExpectation Arguments)
        {
            var env = new Dictionary<string, object>();
            var leaf = _tree.Select(Url);

            Selected = leaf.Pattern;

            leaf.SetValues(env, RouteTree.ToSegments(Url));

            Arguments = new ArgumentExpectation(env);
        }

The input value is just a single string “Url.” The method above takes that url string, runs it through the RouteTree object we had previously configured (“If the routes are”), finds the selected route, and fills the two out parameters. Storyteller itself will compare the two out values to the expected values defined by the specification. In the case of “Selected”, it just compares two strings. In the case of “ArgumentExpectation”, that’s a custom type I built in the Alba testing library as a custom assertion for this grammar. The key parts of ArgumentExpectation are shown below:

        private readonly string[] _spread;
        private readonly IDictionary<string, object> _args;

        public ArgumentExpectation(string text)
        {
            _spread = new string[0];
            _args = new Dictionary<string, object>();

            if (text == "NONE") return;

            var args = text.Split(';');
            foreach (var arg in args)
            {
                var parts = arg.Trim().Split(':');
                var key = parts[0].Trim();
                var value = parts[1].Trim();
                if (key == "spread")
                {
                    _spread = value == "empty" 
                        ? new string[0] 
                        : value.Split(',')
                        .Select(x => x.Trim()).ToArray();
                }
                else
                {
                    _args.Add(key, value);
                }

            }
        }

        public ArgumentExpectation(Dictionary<string, object> env)
        {
            _spread = env.GetSpreadData();
            _args = env.GetRouteData();
        }

        protected bool Equals(ArgumentExpectation other)
        {
            return _spread.SequenceEqual(other._spread) 
                && _args.SequenceEqual(other._args);
        }

Storyteller provides quite a bit of customization on how the engine can convert a string to the proper .Net type for any particular “Cell.” In the case of ArgumentExpectation, Storyteller has a built in convention to use any constructor function with the signature “ctor(string)” to convert a string to the specified type and I exploit that ability here.

You can find all of the code for the RoutingFixture behind the specification above on GitHub. If you want to play around or see all of the parts of the specification, you can run the Storyteller client for Alba by cloning the Github repository, then running the “storyteller.cmd” file to compile the code and open the Storyteller client to the Alba project.

Why was this useful?

Some of you are rightfully reading this and saying that many xUnit tools have parameterized tests that can be used to throw lots of test scenarios together quickly. That’s certainly true, but the Storyteller mechanism has some advantages:

  1. The test results are shown clearly and inline with the specification html itself. It’s not shown above (because it is a regression test that’s supposed to be passing at all times;-)), but failures would be shown in red table cells with both the expected and actual values. This can make specification failures easier to understand and diagnose compared to the xUnit equivalents.
  2. Only the test inputs and expected results are expressed in the specification body. This makes it substantially easier for non technical stakeholders to more easily comprehend and review the specifications. It also acts to clearly separate the intent of the code from the mechanical details of the API. In the case of the Alba routing engine, that is probably important because the implementation today is a little tightly coupled to OWIN hosting but it’s somewhat likely we’d like to decouple the router from OWIN later as ASP.Net seems to be making OWIN a second class citizen from here on out.
  3. The Storyteller specifications or their results can be embedded into technical documentation generated by Storyteller. You can see an example of that in the Storyteller docs themselves.
  4. You can also add prose in the form of comments to the Storyteller specifications for more descriptions on the desired functionality (not shown here).


Webinar on Storyteller 3 and Why It’s Different

JetBrains is graciously letting me do an online webinar on the new Storyteller 3 tool this Thursday (Jan. 21st). Storyteller is a tool for expressing automated software tests in a form that is consumable by non-technical folks and suitable for the idea of “executable specifications” or Behavior Driven Development. While Storyteller fills the same niche as Gherkin-based tools like SpecFlow or Cucumber, it differs sharply in the mechanical approach (Storyteller was originally meant to be a “better” FitNesse and is much more inspired by the original FIT concept than Cucumber).

In this webinar I’m going to show what Storyteller can do, how we believe you make automated testing more successful, and how that thinking has been directly applied to Storyteller. To try to answer the pertinent question of “why should I care about Storyteller?,” I’m going to demonstrate:

  • The basics of crafting a specification language for your application
  • How Storyteller integrates into Continuous Integration servers
  • Why Storyteller is a great tool for crafting deep reaching integration tests and allows teams to address complicated scenarios that might not be feasible in other tools
  • The presentation of specification results in a way that makes diagnosing test failures easier
  • The steps we’ve taken to make test data setup and authoring “self-contained” tests easier
  • The ability to integrate application diagnostics into Storyteller with examples from web applications and distributed messaging systems (I’m showing integration with FubuMVC, but we’re interested in doing the same thing next year with ASP.Net MVC6)
  • The effective usage of table driven testing
  • How to use Storyteller to diagnose performance problems in your application and even apply performance criteria to the specifications
  • If there’s time, I’ll also show Storyteller’s secondary purpose as a tool for crafting living documentation

A Brief History of Storyteller

Just to prove that Storyteller has been around for awhile and there is some significant experience behind it:

  • 2004 – I worked on a project that tried to use the earliest .Net version of FIT to write customer facing acceptance testing. It was, um, interesting.
  • 2005 – On a new project, my team invested very heavily in FitNesse testing with the cooperation of a very solid tester with quite a bit of test automation experience. We found FitNesse to be very difficult to work with and frequently awkward — but still valuable enough to continue using it. In particular, I felt like we were spending too much time troubleshooting syntax issues with how FitNesse parsed the wiki text written by our tester.
  • 2006-2008 – The original incarnation of Storyteller was just a replacement UI shell and command line runner for the FitNesse engine. This version was used on a couple projects with mixed success.
  • 2008-2009 – For reasons that escape me at the moment, I abandoned the FitNesse engine and rewrote Storyteller as its own engine with a new hybrid WPF/HTML client for editing tests. My concern at the time was to retain the strengths of FIT, especially table-driven testing, while eliminating much of the mechanical friction in FIT. The new “Storyteller 1.0” on Github was somewhat successful, but still had a lot of usability problems.
  • 2012 – Storyteller 2 came with some mild improvements on usability when I changed into my current position.
  • End of 2014 – My company had a town hall style meeting to address the poor results we were having with our large Storyteller test suites. Our major concerns were the efficiency of authoring specs, the reliability of the automated specs, and the performance of Storyteller itself. While we considered switching to SpecFlow or even trying to just do integration tests with xUnit tools and giving up on the idea of executable specifications altogether, we decided to revamp Storyteller instead of ditching it.
  • First Half of 2015 – I effectively rewrote the Storyteller test engine with an eye for performance and throughput. I ditched the existing WPF client (and nobody mourned it)  and wrote an all new embedded web client based on React.js for editing and interactively running specifications. The primary goals of this new Storyteller 3.0 effort has been to make specification authoring more efficient and to try to make the execution more performant. Quite possibly the biggest success of Storyteller 3 in real project usage has been the extra diagnostics and performance information that it exposes to help teams understand why tests and the underlying systems are behaving the way that they are.
  • July 2015 – now: The alpha versions of Storyteller 3 are being used by several teams at my shop and a handful of early adopter teams. We’ve gotten a couple useful pull requests — including several usability improvements from my colleagues — and some help with understanding what teams really need.

Storyteller 3: Executable Specifications and Living Documentation for .Net

tl;dr: The open source Storyteller 3 is an all new version of an old tool that my shop (and others) use for customer facing acceptance tests, large scale test automation, and “living documentation” generation for code-centric systems.

A week from today I’m giving a talk at .Net Unboxed on Storyteller 3, an open source tool largely built by myself and my colleagues for creating, running, and managing Executable Specifications against .Net projects based on what we feel are the best practices for automated testing based on over a decade of working with automated integration testing. As I’ll try to argue in my talk and subsequent blog posts, the most complete approach in the .Net ecosystem for reliably and economically writing large scale automated integration tests.

My company and a couple other early adopters have been using Storyteller for daily work since June and the feedback has been pleasantly positive so far. Now is as good of time as any to make a public beta release for the express purpose of getting more feedback on the tool so we can continue to improve the tool prior to an official 3.0 release in January.

If you’re interested in kicking the tires on Storyteller, the latest beta as of now is 3.0.0.279-alpha available on Nuget.org. For help getting started, see our tutorial and getting started pages.

Some highlights:

It’s improved a lot since then, but I gave a talk at work in March previewing Storyteller 3 that at least discusses the goals and philosophy behind the tool and Storyteller’s approach to acceptance tests and integration tests.

A Brief History

I had a great time at Codemash this year catching up with old friends. I was pleasantly surprised when I was there to be asked several times about the state of Storyteller, an OSS project others had originally built in 2008 as a replacement for FitNesse as our primary means of expressing and executing automated customer facing acceptance tests. Frankly, I always thought that Storyteller 1 and the incrementally better Storyteller 2 were failures in terms of usability and I was so burnt out on working with it that I had largely given up on it and ignored it for years.

Unfortunately, my shop has a large investment in Storyteller tests and our largest and most active project was suffering with heinously slow and unreliable Storyteller regression test suites that probably caused more harm than good with their support costs. After a big town hall meeting to decide whether to scrap and replace Storyteller with something else, we instead decided to try to improve Storyteller to avoid having to rewrite all of our tests. The result has been an effective rewrite of Storyteller with an all new client. While trying very hard to mostly preserve backward compatibility with the previous version in its public API’s, the .Net engine is also a near rewrite in order to squeeze out as much performance and responsiveness as we could.

Roadmap

The official 3.0 release is going to happen in early January to give us a chance to possibly get more early user feedback and maybe to get some more improvements in place. You can see the currently open issue list on GitHub. The biggest things outstanding on our roadmap are:

  • Modernize the client technology to React.js v14 and introduce Redux and possibly RxJS as a precursor to doing any big improvements to the user interface and trying to improve the performance of the user interface with big specification suites
  • A “step through” mode in the interactive specification running so users can step through a specification like you would in a debugger
  • The big one, allow users to author the actual specification language in the user interface editor with some mechanics to attach that language to actual test support code later