
I published the Storyteller 5.0 release last night. I punted on doing any kind of big user interface overhaul for now, and just released the back end improvements on their own with some vague idea that there’d be an improved or at least restyled user interface later this year.
The key improvements are:
- Netstandard 2.0 support
- An easier getting started story
- Streamlined command line usage
- Easier “F5 debugging” for specifications in your IDE
- No changes whatsoever to your Fixture code from 4.0
Getting Started with Storyteller 5
Previous versions of Storyteller have been problematic for new users getting started and setting up projects with the right Nuget dependencies. I felt like things got a little better with the dotnet cli, but the enduring problem with that is how few .Net developers seem to be using it or familiar with it. When you use Storyteller 5, you need two dependencies in your Storyteller specification project:
- A reference to the Storyteller 5.0 assembly via Nuget
- The dotnet-storyteller command line tool referenced as a dotnet cli tool in your project, and that’s where most of the trouble come in.
To start up a new Storyteller 5.0 specification project, first make the directory where you want the project to live. Next, use the dotnet new console command to create a new project with a csproj file and a Program.cs file.
In your csproj file, replace the contents with this, or just add the package reference for Storyteller and the cli tool reference for dotnet-storyteller as shown below:
    netcoreapp2.0
    EXE
Next, we need to get into the entry point to this new console application change the Program.Main() method to activate the Storyteller engine within this new project:
    public class Program
    {
        public static int Main(string[] args)
        {
            return StorytellerAgent.Run(args);
        }
    }
Internally, the StorytellerAgent is using Oakton to parse the arguments and carry out one of these commands:
  ------------------------------------------------------------------------------
    Available commands:
  ------------------------------------------------------------------------------
       agent -> Used by dotnet storyteller to remote control the Storyteller specification engine
         run -> Executes Specifications and Writes Results
        test -> Try to start and warmup the system under test for diagnostics
    validate -> Use to validate specifications for syntax errors or missing grammars or fixtures
  ------------------------------------------------------------------------------
If you execute the console application with no arguments like this:
|> dotnet run
It will execute all the specifications and write the results to a file named “stresults.htm.”
You can customize the running behavior by passing in optional flags with the pattern dotnet run -- run --flag flagvalue like this example that just writes the results file to a different location:
|> dotnet run -- run Arithmetic -r ./artifacts/results.htm
If you’re not already familiar with the dotnet cli, what’s going on here is that anything to the right of the “–” double dash is considered to be the command line arguments passed into your application’s Main() method. The “run” argument tells the StorytellerAgent that you actually want to run specifications and it’s unfortunately not redundant and very much mandatory if you want to customize how Storyteller runs specifications.
See the Storyteller 5.0 quickstart project for a working example.
Running the Storyteller Specification Editor
Assuming that you’ve got the cli tools reference to dotnet-storyteller and you’ve executed `dotnet restore` at least once (compiling through VS.Net or Rider does this for you), the only thing you need to do to launch the specification editor tool is this from the command line:
|> dotnet storyteller
F5 Debugging
Debugging complicated Storyteller specifications has been its Achille’s Heel from the very beginning. You can always attach a debugger to a running Storyteller process, but that’s clumsy (quicker in Rider than VS.Net, but still). As a cheap but effective improvement in v5, you can run a single specification from the command line with this signature:
|> dotnet run -- run "Suite1 / ChildSuite1 / Specification Name"
This is admittedly pretty ugly, but remember that you can tell either Rider or VS.Net to pass arguments to your console application when your press F5 to run an application in debug mode. I utilize this quite a bit in Jasper development to troubleshoot individual specifications. Here’s what the configuration looks like for this in Rider:
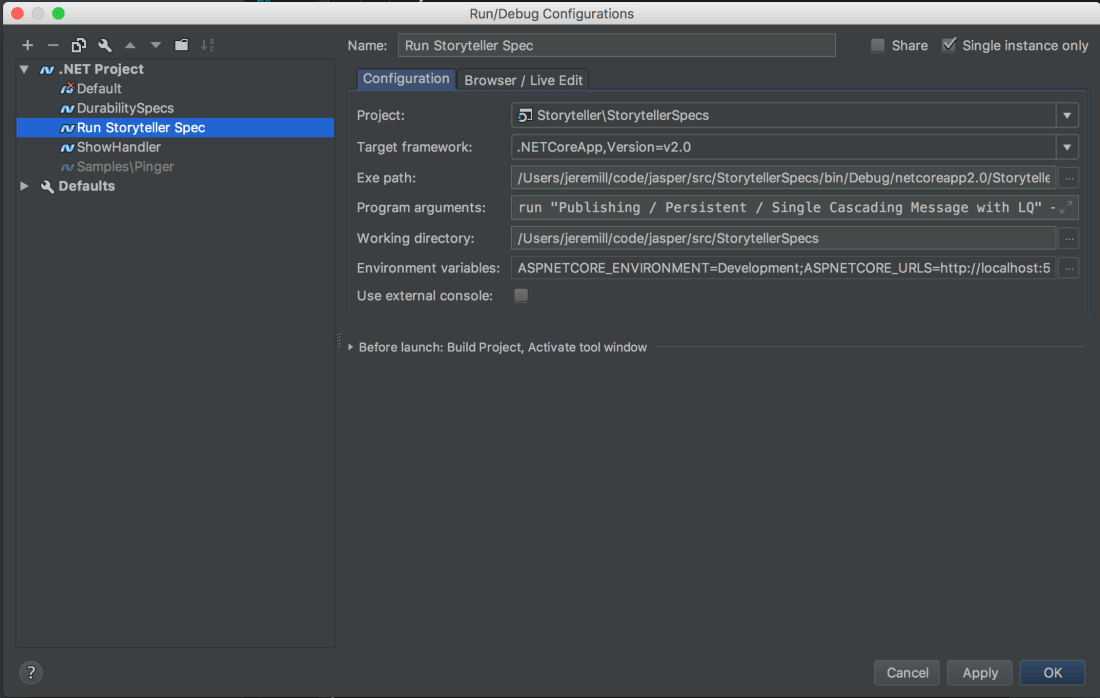
See the “Program arguments” specifically. Once the path to the specification is configured, I can just hit F5 and jump right into a debugging session running just that specification.
We looked pretty hard at supporting the dotnet test tooling so you could run Storyteller specifications from either Visual Studio.Net’s or Rider/ReSharper’s test runners, but all I could think about after trying to reverse engineer xUnit’s tooling around that was a certain Monty Python scene.

Does this work with Visual Studio 2010? Do you have any tutorials that don’t include the CLI?
Storyteller 5 only supports VS2017 projects. You can use older Storyteller 3 with VS2010, and there are still directions on the website about that. It’s admittedly clumsier though.
Your work is much appreciated, thank you Jeremy