
Everything in this post is from a proof of concept project we did for the technique described here. We have not used this tooling on a real project yet, but we have a team starting a project where this might be useful, so I promised a write up for them.
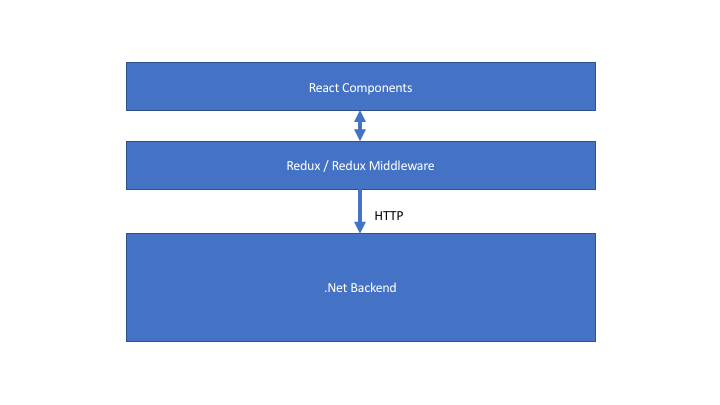
In my previous post I laid out how I see the testing pyramid and test tool and technique choices against my company’s typical web application technology stack. As a reminder, our recommended stack for new development on web applications or API’s looks like this (plus a backing database):
Last week I talked through how we might test the React components and Redux store setup, including the interaction between Redux and React. I also talked about how we could go about testing the .Net backend both at a unit level and through integration tests through to the backing database. Lastly, I said we’d use a modicum of end to end, Selenium-based tests, but said that we should avoid depending on too many of those kinds of tests. That leaves us with a pretty big hole in coverage against the interaction between the Javascript code running in the browser and the .Net code and database interactions running server side.
As a possible solution for this gap, my team at work did a proof of concept for using Storyteller to do subcutaneous testing against the full application stack, but minus the actual React component “view layer.” The general idea is to use Storyteller with its Storyteller.Redux extension to host the ASP.Net Core application so that it can easily drive both test data input through the real data layer of the .Net code and then turn around and use the real system services to verify the state of the application and the backing database as the “assert” stage of the tests. The basic value proposition here is that this mechanism could be far more efficient in terms of developer time against its benefits compared to end to end, Selenium based testing. We’re also theorizing that the feedback cycles would be much tighter through faster tests and definitely more reliable tests than the equivalent tests against the browser every could be.
A couple things to note or argue:
- This technique would be most useful if your React components are generally dumb and only communicate with the external world by dispatching well defined actions to the Redux store (I’m assuming that you’re utilizing Redux middleware like redux-thunk or redux-saga here).
- Why Storyteller as the driver for this instead of another test runner? I’m obviously biased, but I think Storyteller has the very best story in test automation tooling for declarative set up and verification of system state. Plus, unlike any of the xUnit tools I’m aware of, Storyteller is built specifically with integration testing in mind (think configurable retries, bailing out on runaway tests, better control over the lifecycle of the test harness)
- Storyteller has support for declarative assertions against a JSON document that should be handy for making assertions against the Redux store state
- We’re theorizing that it’ll be vastly easier to make assertions against the Redux store state than it would to hunt down DOM elements with Selenium
- The Storyteller.Redux extension subscribes to any changes to the store state and exposes that to the Storyteller test engine. The big win here is that it gives you a single mechanism to handle the dreaded “everything is asynchronous so how does the test harness know when it’s time to check the expected outcomes” problem that makes Selenium testing so dad gum hard in the real world.
- The Storyteller.Redux extension can capture any logged messages to console.log or console.error in the running browser. Add that to any server side logging that you can also pipe into the Storyteller results
The general topology in these tests would look like this:
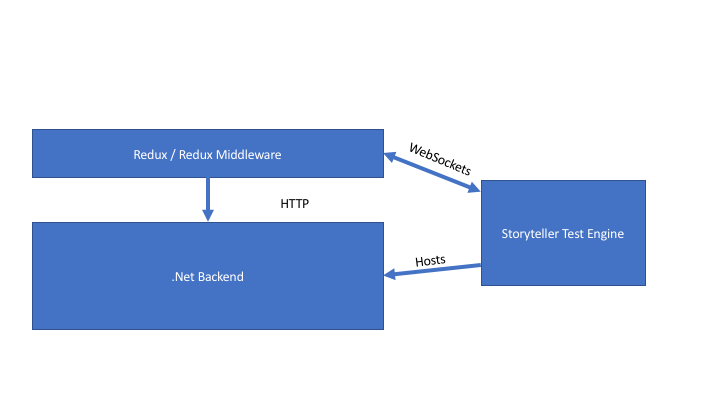
The test harness would consist of:
- A Storyteller project that bootstraps the ASP.Net Core application and runs it within the Storyteller test engine. You can use the Storyteller.AspNetCore extension to make that easier (or you could after I update it for ASP.Net Core 2 and its breaking changes).
- The Storyteller.Redux extension for Storyteller provides the Websockets glue to communicate between the launched browser with your Redux store and the running Storyteller engine
- The Storyteller ISystem in this project has to have some way to launch a web browser to the page that hosts the Javascript bundle. In the proof of concept project, I just built out a static HTML page that included the bundle Javascript and directly launched the browser to the file location, but you could always use Selenium just to open the brower and navigate to the right Url.
- Storyteller Fixtures for setting up system state for tests, sending Redux actions directly to the running Redux store to simulate user interactions, asserting on the expected system state on the backend, and checking the expected Redux store state
- An alternative Javascript bundle that includes all the reducer and middleware code in your application, along with some “special sauce” code shown in a section down below that enables Storyteller to send messages and retrieve the current state of the running Redux store via Websockets.
The Special Sauce in the Javascript Bundle
Your custom bundle for the subcutaneous testing would need to have this code in its Webpack entry point file (the full file is on GitHub here):
// "store" is your configured Redux store object.
// "transformState" is just a hook to convert your Redux
// store state to something that Storyteller could consume
function ReduxHarness(store, transformState){
    if (!transformState){
        transformState = s => s;
    }

    function getQueryVariable(variable)
    {
       var query = window.location.search.substring(1);
       var vars = query.split("&");
       for (var i=0;i<vars.length;i++) {                var pair = vars[i].split("=");                if(pair[0] == variable){return pair[1];}        }        return(false);     }     var revision = 1;     var port = getQueryVariable('StorytellerPort');     var wsAddress = "ws://127.0.0.1:5250";     var socket = new WebSocket(wsAddress); 	socket.onclose = function(){ 		console.log('The socket closed'); 	}; 	socket.onerror = function(evt){ 		console.error(JSON.stringify(evt)); 	}     socket.onmessage = function(evt){         if (evt.data == 'REFRESH'){             window.location.reload();             return;         }         if (evt.data == 'CLOSE'){             window.close();             return;         } 		var message = JSON.parse(evt.data); 		console.log('Got: ' + JSON.stringify(message) + ' with topic ' + message.type); 	 		store.dispatch(message); 	};     store.subscribe(() => {
        var state = store.getState();

        revision = revision + 1;
        var message = {
            type: 'redux-state',
            revision: revision,
            state: transformState(state)
        }

		if (socket.readyState == 1){
            var json = JSON.stringify(message);
            console.log('Sending to engine: ' + json);
			socket.send(json);
		}
    });

    // Capturing any kind of client side logging
    // and piping that into the Storyteller test results
    var originalLog = console.log;
    console.log = function(msg){
        originalLog(msg);

        var message = {
            type: 'console.log',
            text: msg
        }

        var json = JSON.stringify(message);
        socket.send(json);
    }

    // Capture any logged errors in the JS code
    // and pipe that into the Storyteller results
    var originalError = console.error;
    console.error = function(e){
        originalError(e);

        var message = {
            type: 'console.error',
            error: e
        }

        var json = JSON.stringify(message);
        socket.send(json);
    }
}


ReduxHarness(store, s => s.toJS())
The Storyteller System
In my proof of concept, I connected Storyteller to the Redux testing bundle like this (the real code is here):
    public class Program
    {
        public static void Main(string[] args)
        {
            StorytellerAgent.Run(args, new ReduxSampleSystem());
        }
    }

    public class ReduxSampleSystem : SimpleSystem
    {
        protected override void configureCellHandling(CellHandling handling)
        {
            // The code below is just to generate the static file I'm
            // using to host the reducer + websockets code
            var directory = AppContext.BaseDirectory;
            while (Path.GetFileName(directory) != "ReduxSamples")
            {
                directory = directory.ParentDirectory();
            }

            var jsFile = directory.AppendPath("reduxharness.js");
            Console.WriteLine("Copying the reduxharness.js file to " + directory);
            var source = directory.AppendPath("..", "StorytellerRunner", "reduxharness.js");


            File.Copy(source, jsFile, true);

            var harnessPath = directory.AppendPath("harness.htm");
            if (!File.Exists(harnessPath))
            {
                var doc = new HtmlDocument();

                var href = "file://" + jsFile;

                doc.Head.Add("script").Attr("src", href);

                Console.WriteLine("Writing the harness file to " + harnessPath);
                doc.WriteToFile(harnessPath);
            }

            var url = "file://" + harnessPath;

            // Add the ReduxSagaExtension and point it at your view
            handling.Extensions.Add(new ReduxSagaExtension(url));
        }
    }
The static HTML file generation above isn’t mandatory. You *could* do that by running the real page from the instance of the application hosted within Storyteller as long as the ReduxHarness function shown above is applied to your Redux store at some point.
Storyteller Fixtures that Drive or Check the Redux Store
For driving and checking the Redux store, we created a helper class called ReduxFixture that enables you to do simple actions and value checks in a declarative way as shown below:
    public class CalculatorFixture : ReduxFixture
    {
        // There's a little bit of magic here. This would send a JSON action
        // to the Redux store like {"type": "multiply", "operand": "5"}
        [SendJson("multiply")]
        public void Multiply(int operand)
        {

        }

        // Does an assertion against a single value within the current state
        // of the redux store using a JSONPath expression
        public IGrammar CheckValue()
        {
            return CheckJsonValue("$.number", "The current number should be {number}");
        }

    }
You can of course skip the built in helpers and send JSON actions directly to the running browser or write your own assertions against the current state of the Redux store. There’s also some built in functionality in the ReduxFixture class to track Redux store revisions and to wait for any change to the Redux store before performing assertions.

Thanks for posting this, it inspired me to extend out a sample aspnetcore support approach:
https://blog.csmac.nz/storytellerreduxsample/